How Can I Increase My WordPress Website Speed? Do These 4 Easy Steps
By now, many of us have probably heard Microsoft’s report from 2015 that states the attention span of an average person has declined from 12 seconds to 8 seconds over the last 7 years. Considering the fast-paced culture we live in and the expectations we have set with technology, we have access to all the information we need – right at the palm of our hands.
The need for accessibility plays a direct role in how efficient your webpage should be with its ability to load content and be accessible to a user. Statistics show 53% of users leave a website if it takes longer than 3 seconds to load.
The need for accessibility plays a direct role in how efficient your webpage should be with its ability to load content and be accessible to a user. Statistics show 53% of users leave a website if it takes longer than 3 seconds to load.”
To keep your website easy and fast to access, know these 4 simple steps on how you can optimize the speed of your WordPress website and make it load at a lightning fast rate.
Here are my steps:
Step #1: Choose Quality WordPress Web Hosting
With experience in a wide variety of web hosting solutions like Bluehost, HostGator, GoDaddy, I have found Kinsta and WordPress Engine to be top-notch providers for WordPress websites that keep up to date with the latest technology related to speed. They offer fast hardware, a large variety of features and tools, and top speed PHP execution. PHP 7.1 is their default version providing great response time and optimal performance.
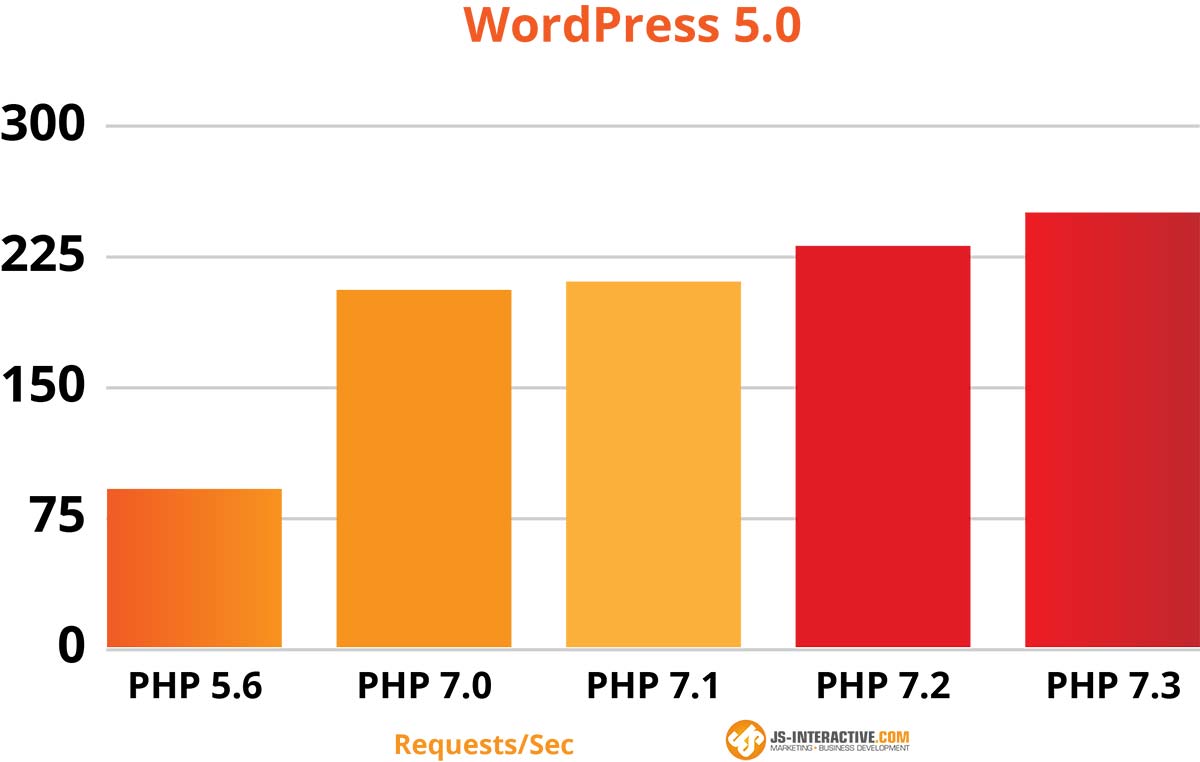
PHP versioning ad speed variations by requests/sec
Their latest technology adopts QUIC speed servers that allow websites to load fast even on a slow connection and is paving the way for the next internet protocol, HTTP/3.
As always, I encourage developers to do their own research. You will find lots of articles supporting SiteGround as a premier web hosting solution in hosting review sites like:
- Hosting Advice
TIP: If you are currently running a WordPress website and would like to upgrade your PHP versioning to 7.1, I would recommend installing WP Engine’s PHP Compatibility Checker first. Select your PHP Version within your settings and run a scan on all your active plugins and themes to ensure compatibility.

Run a scan to ensure PHP compatibility with theme and plugins
Step #2: Optimize Your Caching and Performance
When a user visits a website, the browser requests assets from your web server which in return loads your WordPress website. These assets include PHP processing, database requests, and files that get sent to the browser which renders a fully functioning webpage. This process alone takes several seconds.
What popular plugin solutions like WP Rocket, WP Super Cache, etc., do is replace the process by sending a compiled static HTML file to the browser, which results in a much faster return. This static file is stored locally on your computer and is accessed each time there is a 2nd visit, 3rd visit and so on to your website. Since the file is static, only by clearing or refreshing a cache will a page reload any dynamic content that includes web changes.
WP Rocket has been a preferred solution for caching based on a number of reasons. They offer a ton of features, easy-to-use integration, great support and a large knowledge base to tackle the many challenges that go along with leveraging a browser cache. They constantly work to improve their tools as well, which provides an assurance that their plugin remains up-to-date with industry trends.
Here are some screenshots of what my configuration typically looks like.
Cache
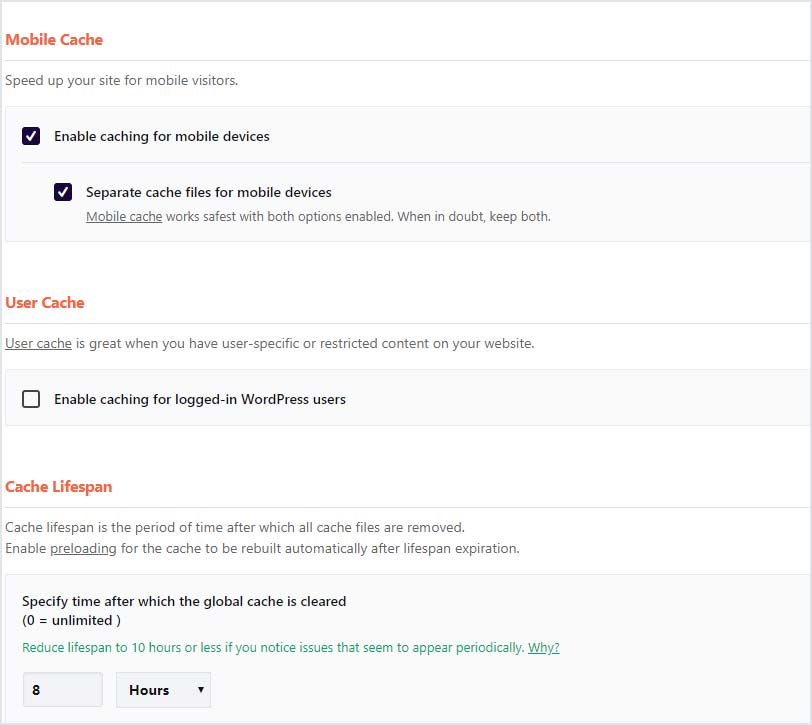
Cache settings and configuration
Mobile Caching. This simply means faster mobile load times.
User Cache. I only enable caching for logged-in users if my website runs forums, memberships, etc., that entail users logging into my website.
File Optimization
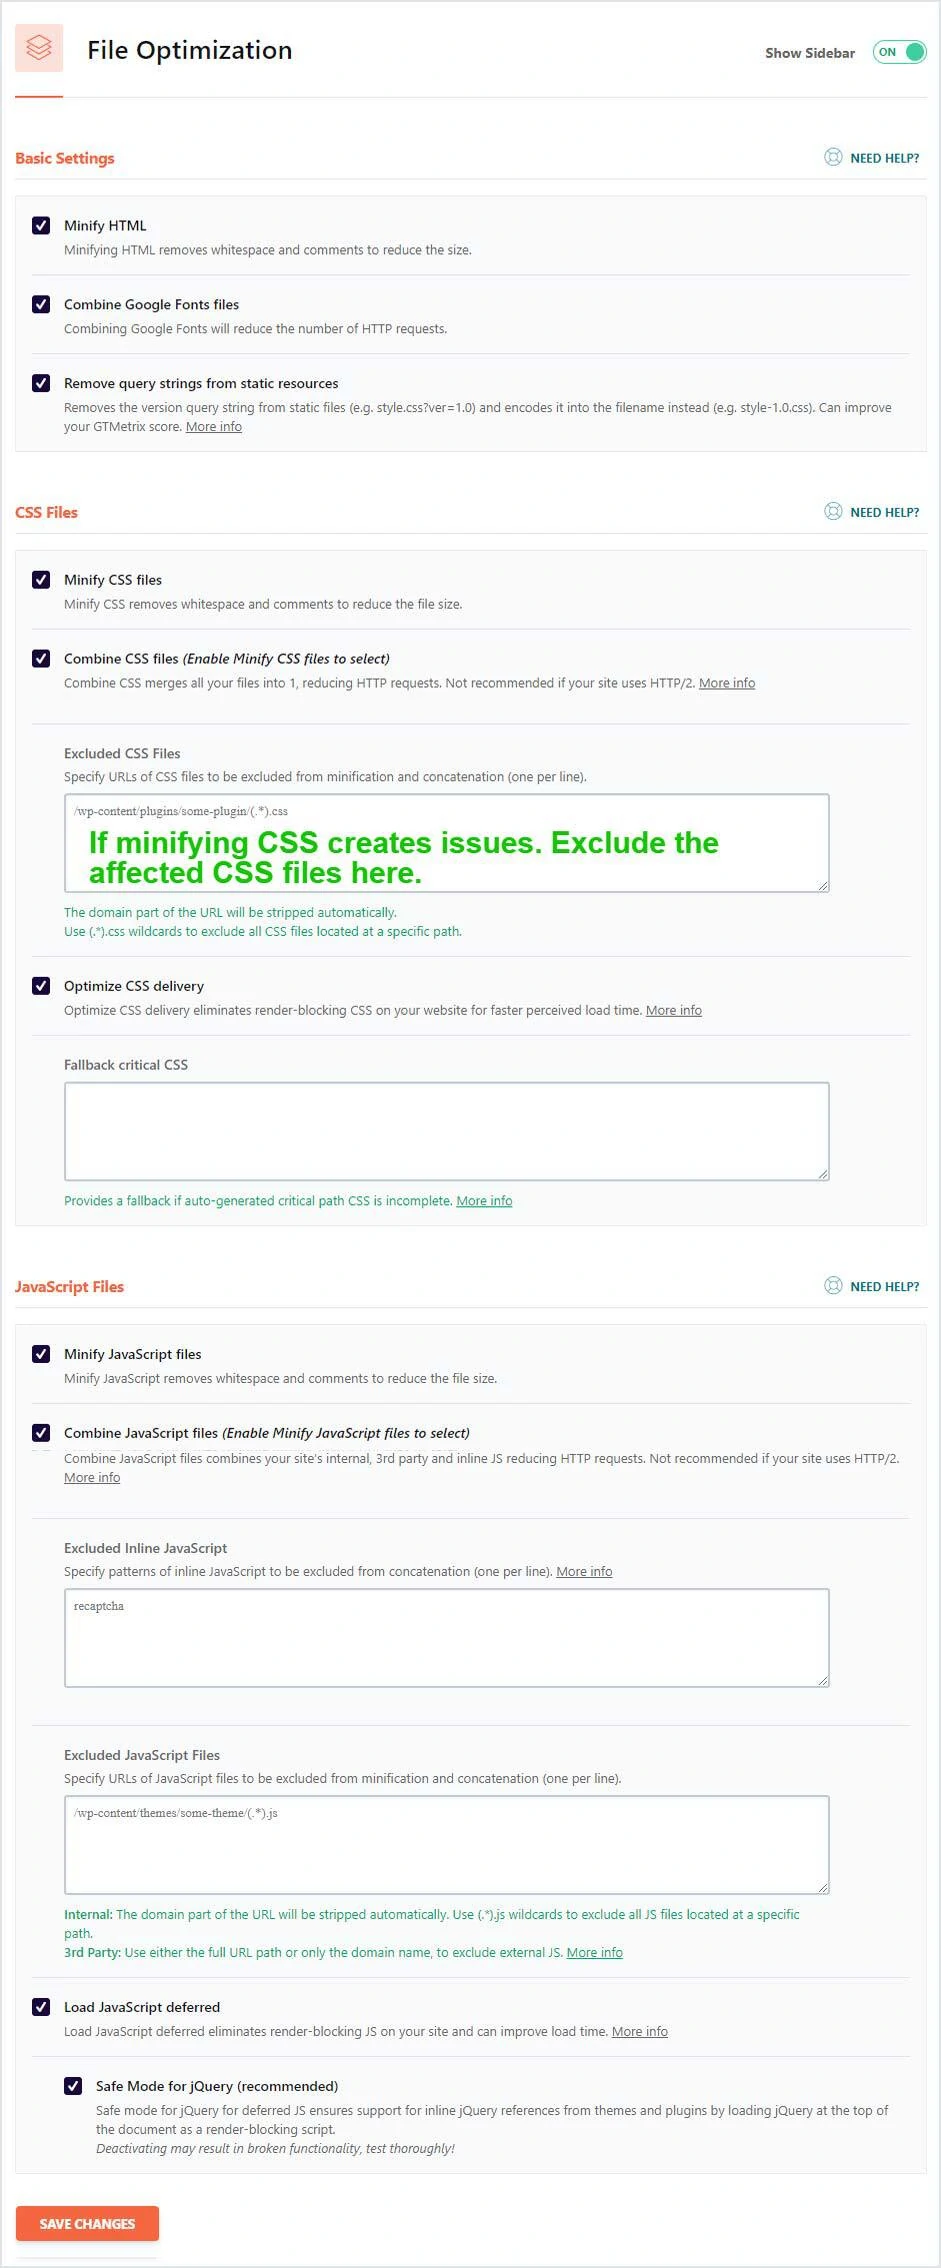
Minify your CSS & JS assets. Be sure to test these settings.
Minifying and combining all files is ideal for optimal results and reporting with tools like GT Metrix and Pingdom. However, in many scenarios, enabling these can cause issues with your website layout. So, proceed with caution. Should your site break due to problematic files, you can choose to exclude these CSS and JS files from minification.
TIP: I use a Chrome Extension called Blue Button which helps me to determine all CSS and JS files being generated on my website. From here, I pick through each file, one at a time, and add to the Exclude CSS files or Exclude JavaScript files section of WP Rocket. Then I clear all caching, including the browser cache to see if there are any changes to the website layout as a result of the exclusion. If the result is still a broken webpage, then repeat the step with each CSS or JS file until the broken layout is resolved. It’s a bit of work, but the end result is worth it. 🙂
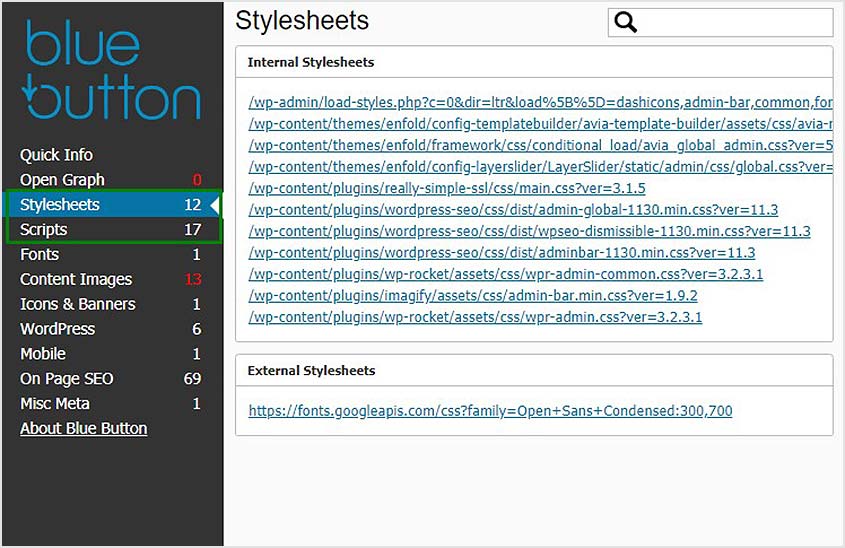
Easily access scripts and stylesheets using the Blue Button Chrome Extension
Media
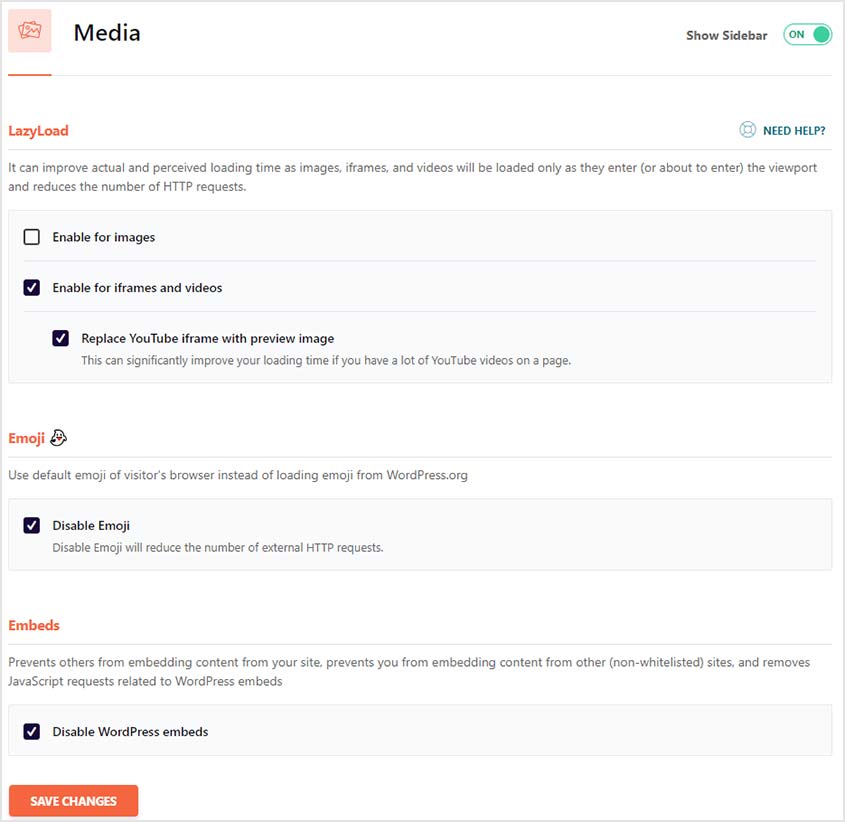
Configure your LazyLoad media settings to reduce your website HTTP requests
Lazy loading delays the loading of images and videos until a user scrolls down the page to where they are intended to display. This feature significantly reduces load times and HTTP requests. Whether I choose to enable this feature for images depends on the theme I am using. In this case, lazy loading images produces undesirable results with the used WordPress theme, so I have chosen not to use the option. Toggle with it yourself to see what works best in your scenario.
By enabling lazy loading for videos, the YouTube iframe gets replaced with a preview image and only loads the video when the play button is clicked.
By disabling emojis, load time on your website is decreased.
Preload
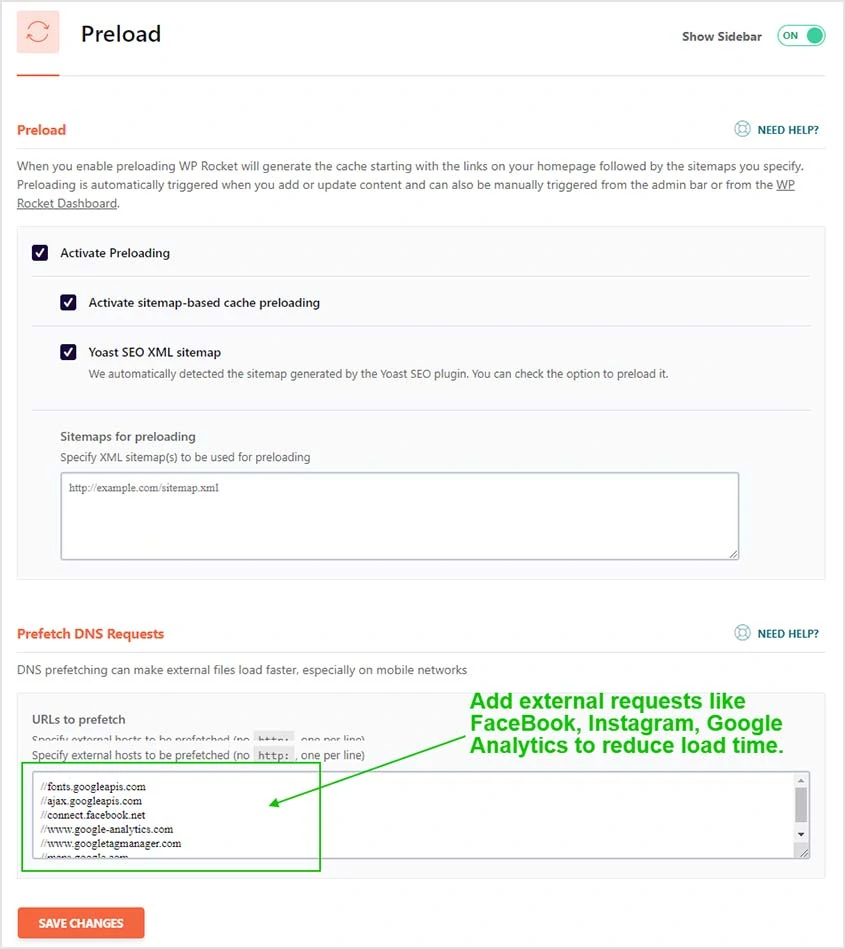
Make your external files load faster by prefetching DNS requests
Activating Preloading. If you have the Yoast SEO plugin installed, it will automatically detect your sitemap. Otherwise, leave Yoast unchecked and manually enter the address of your website’s XML sitemap.
Prefetch DNS Requests. There is a list of common names for Prefetch domains on GitHub that you can copy and paste into your settings field. Apply the applicable ones to help browsers anticipate requests for faster loading.
In the case of this example, common names include:
- //fonts.googleapis.com
- //ajax.googleapis.com
- //connect.facebook.net
- //www.google-analytics.com
- //www.googletagmanager.com
- //maps.google.com
- //cdn.fosterdanowsky.com
Step #3: Implement a Content Delivery Network
If you frequently use page speed tools like Pingdom, GTmetrix and YSlow, you’ll see that a Content Delivery Network (CDN) is recommended for optimal website delivery. CDN is a system of distributed servers that deliver website content to users based on their geographical location, the origin of the webpage and content delivery server.
StackPath’s CDN offers a user-friendly platform with great customer support to easily set up and configure a CDN for your website. They provide over 40+ data centers across the US and globe which reduces the distance between your server and site visitors.
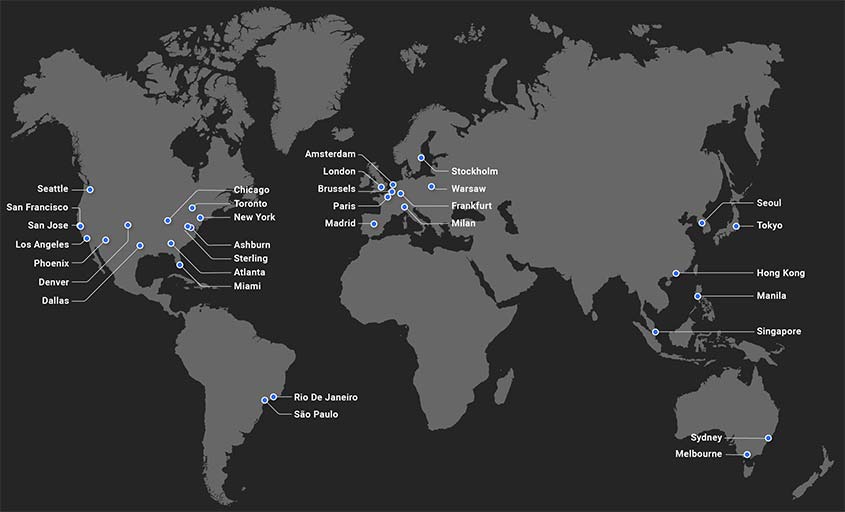
StackPath features global data centers
To get set up, create a 30-day trial of the StackPath CDN. Note: You will want to click on Individual Services, and select the CDN option at $10/month.
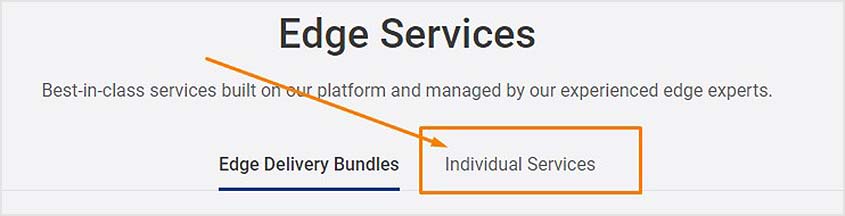
To subscribe to the CDN, be sure to select Individual Services
Create an account with your preferred credentials and create a new site and add your primary domain as your delivery domain for the account.
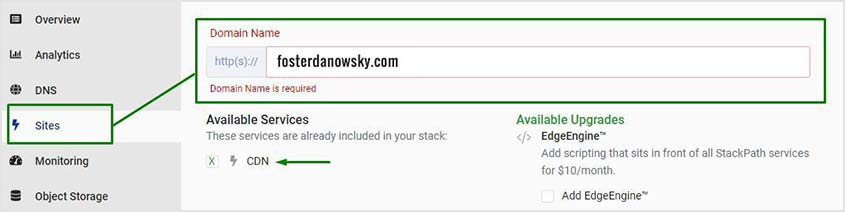
Setup a new site and delivery domain using your primary domain
StackPath automatically detects the origin IP of your web server and creates a CDN URL for your use. In the upper right corner of your dashboard, you will see your StackPath address. This is the address needed for the final step when configuring your CDN.
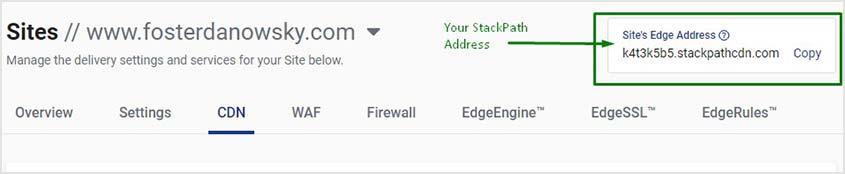
: StackPath automatically creates a CDN URL. Found in the upper-right corner of your dashboard.
To customize the settings for your CDN, you will want to review the Cache Handling and Client Browser Policy. The screenshot below highlights the configuration I have used to produce the best results. Keep in mind that scenarios may differ based on your website’s configuration.
Cache Handling
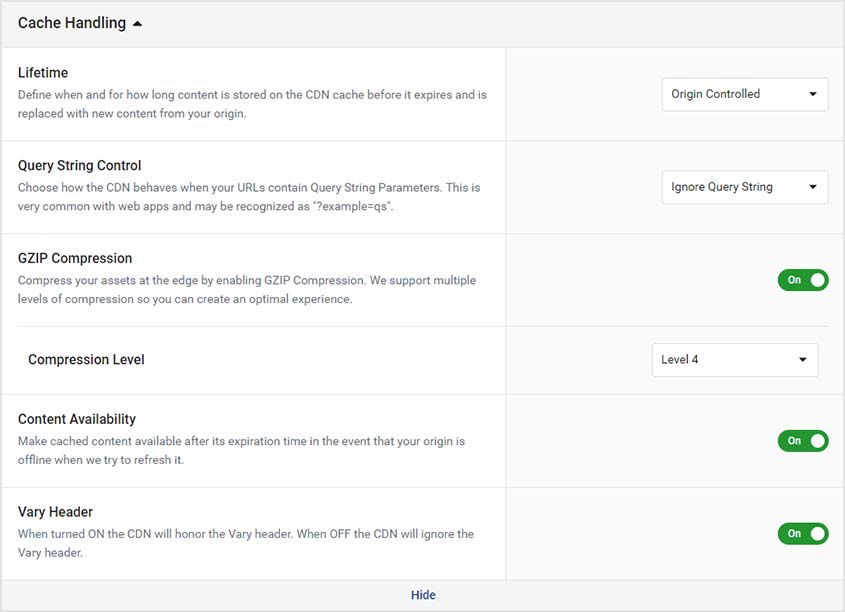
My optimal settings for Cache Handling. You may want to play around with these settings
Lifetime. By setting this to the origin controlled, Stackpath honors the cache-control headers from the origin server.
Query String Control. Determine how you want StackPath to treat URLs that have a query string portion a “?” followed by a series of keyword/value pairs represented by “&x=y”.
Gzip Compression. Enable this to reduce the file size of your text-type content, which will improve delivery speeds. I set my compression level to 4.
Content Availability. Enable this to keep content in cache beyond its expiration time in case we can’t reach your origin. StackPath checks the origin to see if the file is there, then updates it. If not, then the expired asset is served from cache.
Vary Header. Vary is an HTTP response header that allows distinct variations of the same content to be cached using the same URL. The content is selected based on the value of the specified request header, to ensure the right content is served to the right place.
When enabled, the vary header option allows the StackPath CDN to follow your origin server’s vary header when making origin pull requests. When disabled, the CDN will ignore the header when making origin pull requests.
Client Browser Policy
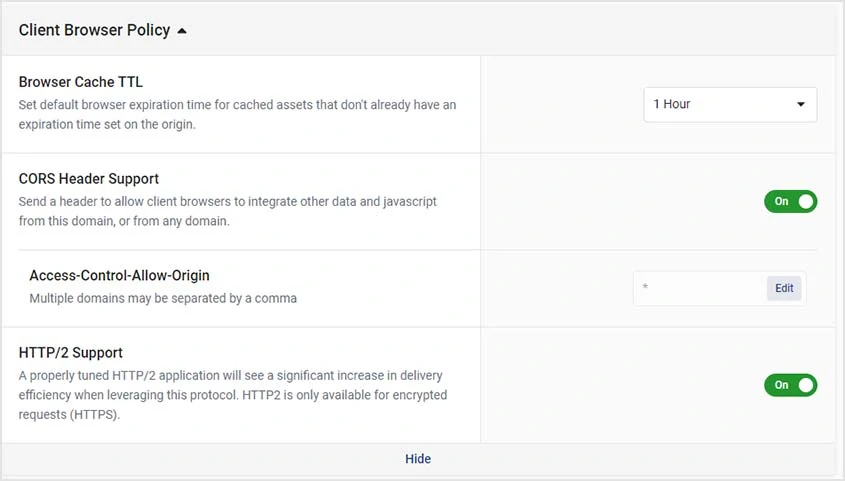
My optimal settings for Client Browser Policy. I usually recommend a shorter Cache TTL, especially on a website that’s updated frequently. You may to want play around with these options, as scenarios may vary.
Browser Cache TTL. Set the length of time that client browsers use to locally cache your content, or defer to the value passed by your origin. How short or long a TTL is can be based on a number of factors, and 24 hours is often recommended. The higher the TTL, the less frequently caching name servers need to query authoritative name servers. The lower the TTL, the sooner the cached record expires. This allows queries for the records to occur more frequently.
CORS Header Support. For security reasons, web browsers will prevent Javascript code from making requests to a different origin (e.g. different domain) than the one it’s hosted on (e.g. requests from origin1.website.com to origin2.website.com will get blocked).
Cross-Origin Resource Sharing (CORS) is a mechanism that uses additional HTTP headers to tell a browser to let a web application running at one origin (domain) have permission to access selected resources from a server at a different origin.
Enabling this feature will send an “Access-Control-Allow-Origin: *” header in the response which will indicate to the client browser which client origins will be allowed to access a resource.
HTTP/2 Support. HTTP/2 is the next generation of web protocol. It has features like binary encoding and multiplexing that make web connections faster and more efficient if your site is designed to make use of them.
Step #4: Image Sizing and Compression
WordPress offers quite a few popular automated image compression tools such as ShortPixel, Smush and Imagify. I have experience with ShortPixel and Imagify and have found both tools to be extremely resourceful. For the sake of this tutorial, I am using Imagify. You can try Imagify for free. They offer a few options on pricing as well; the option you select is really based on your need.
Should you decide on a paid plan, use the coupon code WPROCKET30 to save 30% on your subscription.
Configuring Your Site for Optimal Compression and Speed
Once Imagify has been installed, you can review the configuration I have used below.
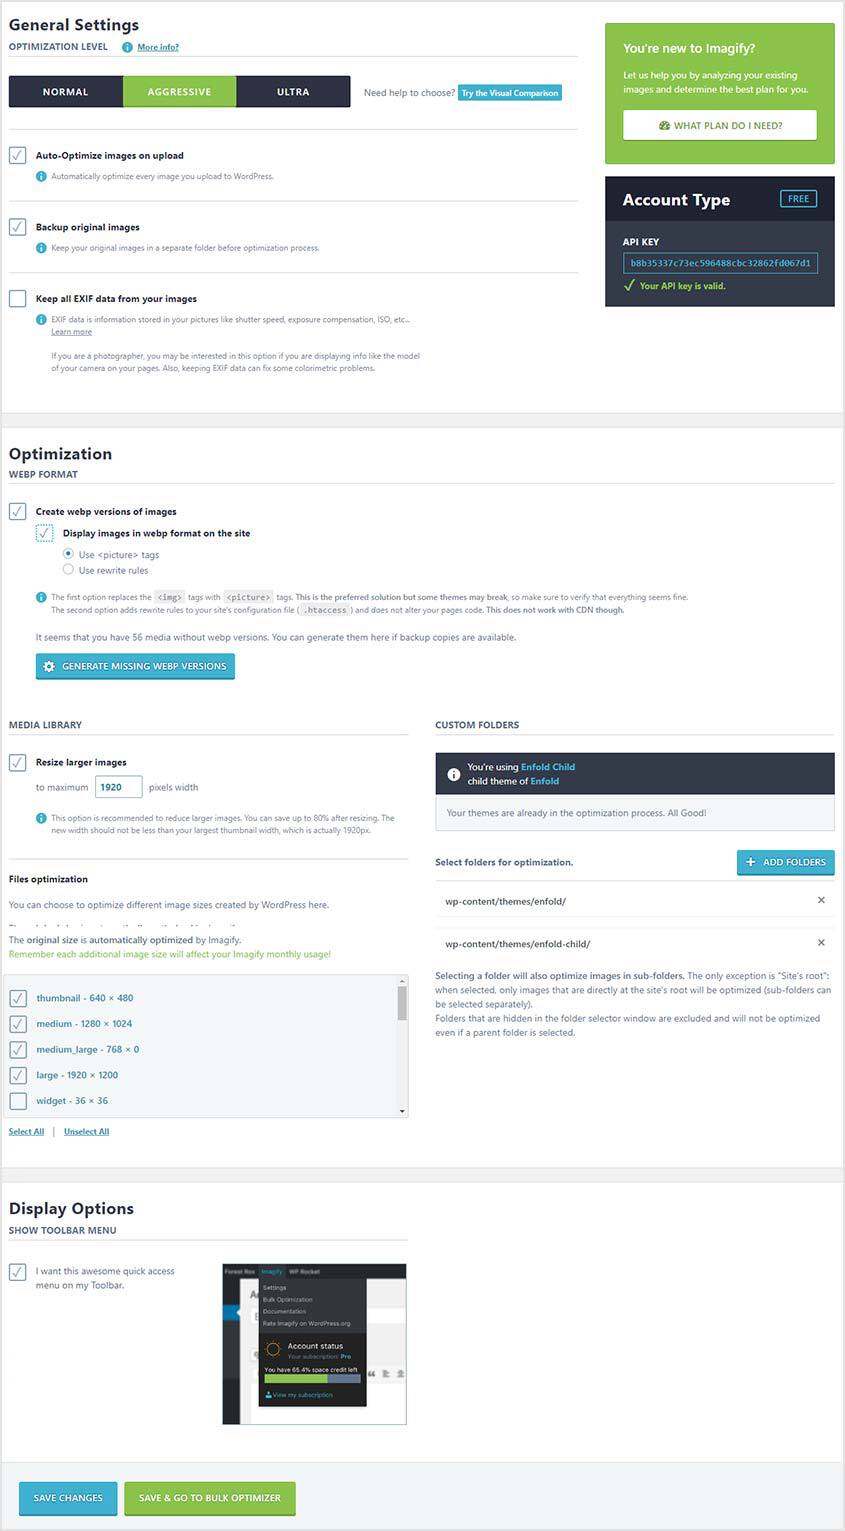
My optimal settings using Imagify. Pay close to attention to the webp format. Checking this option can potentially break a theme if not compatible.
Optimization Level. The optimization I keep at the default level of “Aggressive.” This allows for files to be compressed without any noticeable pixelation on the images. Ultra can have noticeable signs of pixelation, so I personally keep the settings at default to play things safe.
Auto-Optimize images on upload. As you upload original images, your files are immediately optimized for speed.
Backup original images. I would recommend keeping this option on.
Keep all EXIF data from your images. Leave this unchecked. Ideally, you want EXIF data stripped out from your image. What is EXIF data? Let’s say you take a photo from your iPhone, EXIF data is all the extra data tied to the image, such as coordinates from where the image was taken, etc. Unless you have specific requirements to keep that data, I would suggest removing it.
Resize larger image. You will want to consider enabling this, especially in the case where you’re using large hero images. You may want the optimal width set for your hero image. So, if by default, you’ve uploaded an image that’s 4,000 pixels wide, you’ll want to resize that to a more ideal width of 1920px, or whatever width you feel is best for the display of your hero image.
Create webp versions of images. WebP is an image file format created by the web performance team at Google, developed as a replacement for JPEG, PNG, and GIF, while supporting good compression, transparency, and animations.
WebP is not new, but you don’t hear much about it because it’s supported mostly by modern browsers. It continues to grow in popularity and support due to its delivery of dramatically smaller and faster images (an average 50% decrease).
You will want to experiment with this tool. When activated in Imagify, WebP will be served up for the supported browsers. For others, it will serve up the original image instead. I would leave “Display images in webp format on the site” unchecked to avoid any potential conflict with your WordPress theme.
Files optimization. This feature allows you to choose the images, which your WordPress theme and plugins are making versions of, you would like to optimize.
The Results
Below we see my screenshots of the results in both Pingdom and GTmetrix. The load time from each report shows a speed that is faster than 3 seconds (the recommended speed for a webpage).
Below are my speed results:
Pingdom: https://tools.pingdom.com
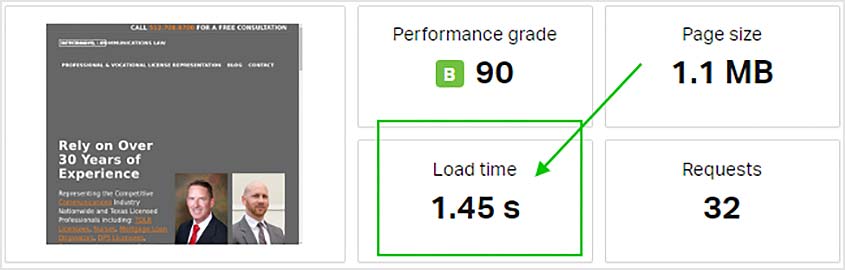
The end result is a load time of 1.45s. Not bad right?
GTmetrix:
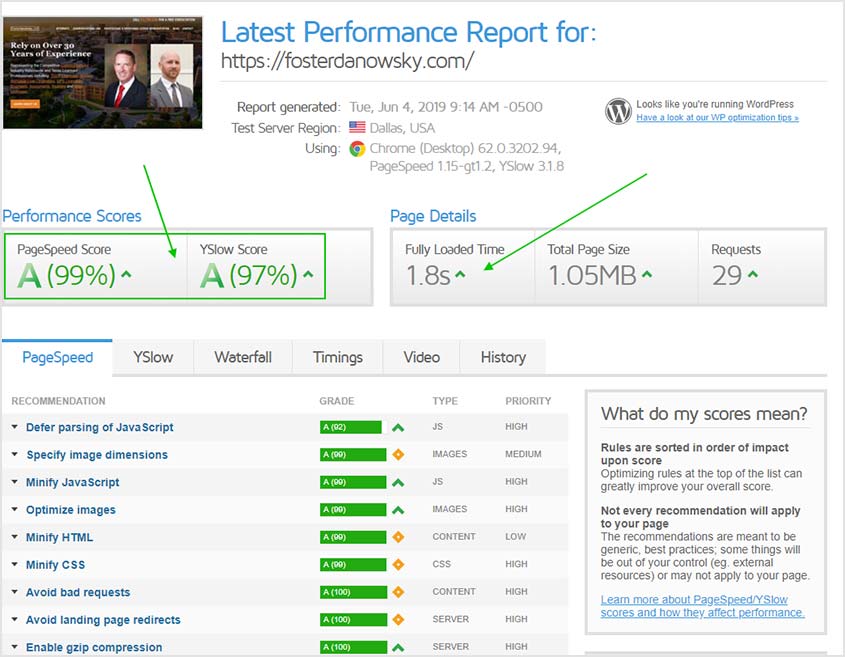
What Developers Need to Understand About Scores
A few things to note before you begin optimizing your own WordPress website.
Don’t lose your marbles chasing scores. The inner geek in us wants to chase the 100% score and “gain the system” so to speak. For me, it’s not an efficient use of developer time. In reality, websites will vary in their configuration, and I have even run into cases where the speed testing tool itself was dated. You can produce great loading time and still not have a perfect score.
GTmetrix and Pingdom have different recommendations and algorithms, so scores will vary between the two. When using these tools, choose a location closest to your web server (not your physical location).
Your goal is speed.
Don’t lose your marbles chasing scores. It’s not an efficient use of developer time. In reality, websites will vary in their configuration. You can produce great loading time and still not have a perfect score. Your goal is speed.”
Tools like PageSpeed Insights offer recommendations about how your site can be faster. The scores represent if your site complies to what Google sets as optimal or “best practices.” The score does NOT guarantee a fast website. Load time impacts ranking, so focusing on optimizing your site for speed and performance is what produces SEO results.
If you need a trusted web designer in Austin who can assist you with improving your website performance, feel free to get in touch with me ».
Get Marketing Insights to your Inbox
Boost visibility, outshine your competitors and attract more customers